BlogGIF-Like Animations with Sanity and Gatsby
GIF-Like Animations with Sanity and Gatsby
HTML5 Video replaces GIF-Animations
Topics:
Sanity
Gatsby
HTML
Read Time: 11 min
Published: 2020.08.31
Last Updated: 2020.11.10
In my Blog-Posts I sometimes use short, repeating animations to support the discussed concepts.
For Example:
To archive similar effects many websites use GIF-Animations but those are no longer state of the art as I will show you in this Blog-Post.
Instead I recommend to use HTML5-Video for this purpose.
The advantages are, among others, smaller file-sizes and a larger color palette (GIF-Files only support 256 Colors).
In this Tutorial I am going to show how to prepare the Video-Files accordingly and how to integrate those in our Sanity-Workflow. Finally I am going to show you how to use those Files in your Gatsby Project.
(But the concept can also be applied to any React-Project or pure HTML-Websites as well)
Preparing the Video-File
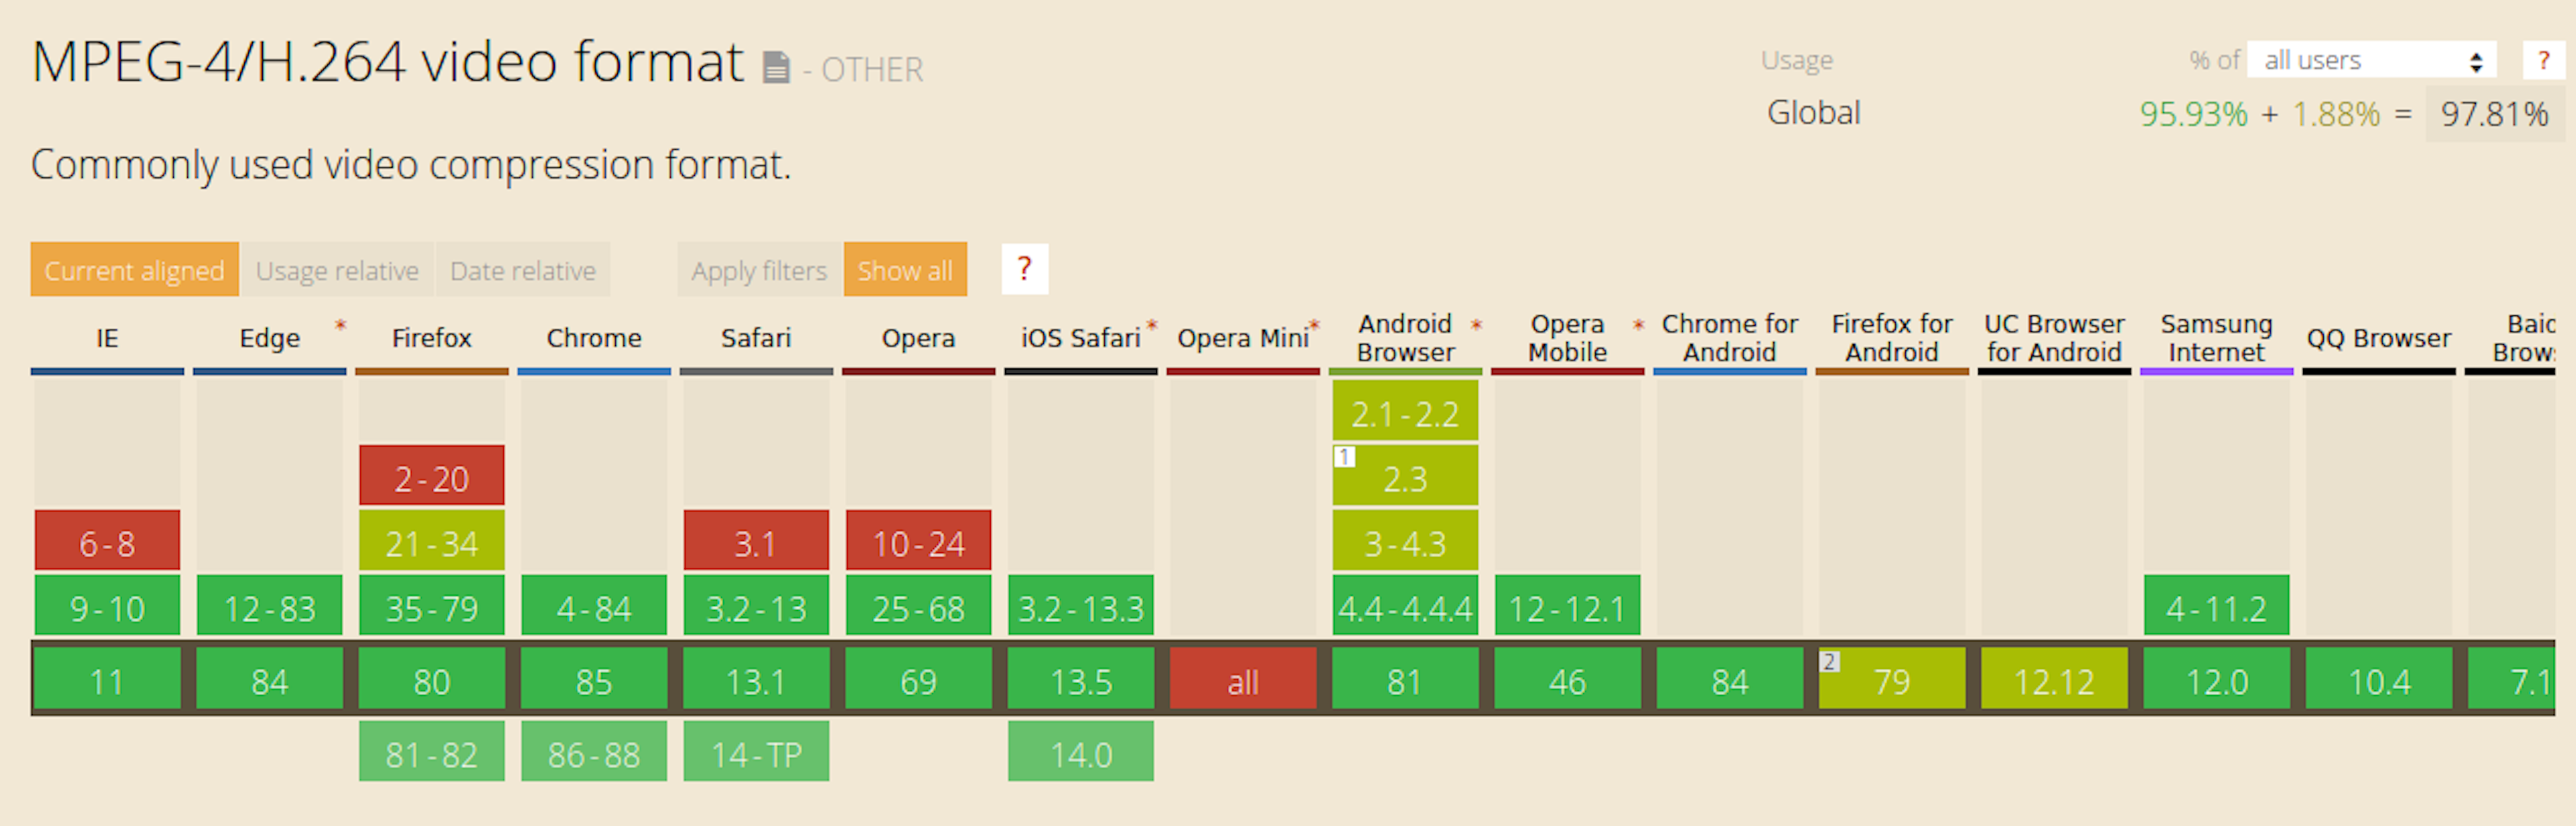
I recommend to use the MP4/H.264 Video-Container Format for HTML5-Video because it is the most widespread at the time of me writing this.
Currently the format is supported by 97,81% of all Web-Browsers according to CanIUse.
Depending on how our source video was created it is very likely not optimized for the use on a website. Typical video recording resolutions today are 1920x1080 pixel (HD) or 3840x2160 pixel (UHD) with 25 or 30 frames per second (Framerate).
For most animations a video-quality that high is not necessary.
For our use cases it is much more important to archive a file size as small as possible in order for our website to retain a fast loading speed.
For my Blog-Posts I usually use a horizontal resolution of 700px with a Framerate of 15.
As a video converter, I recommend: HandBrake
It is free to use, lets dive in ;-)
Handbrake - Summary
When we start the program we are greeted with this menu:
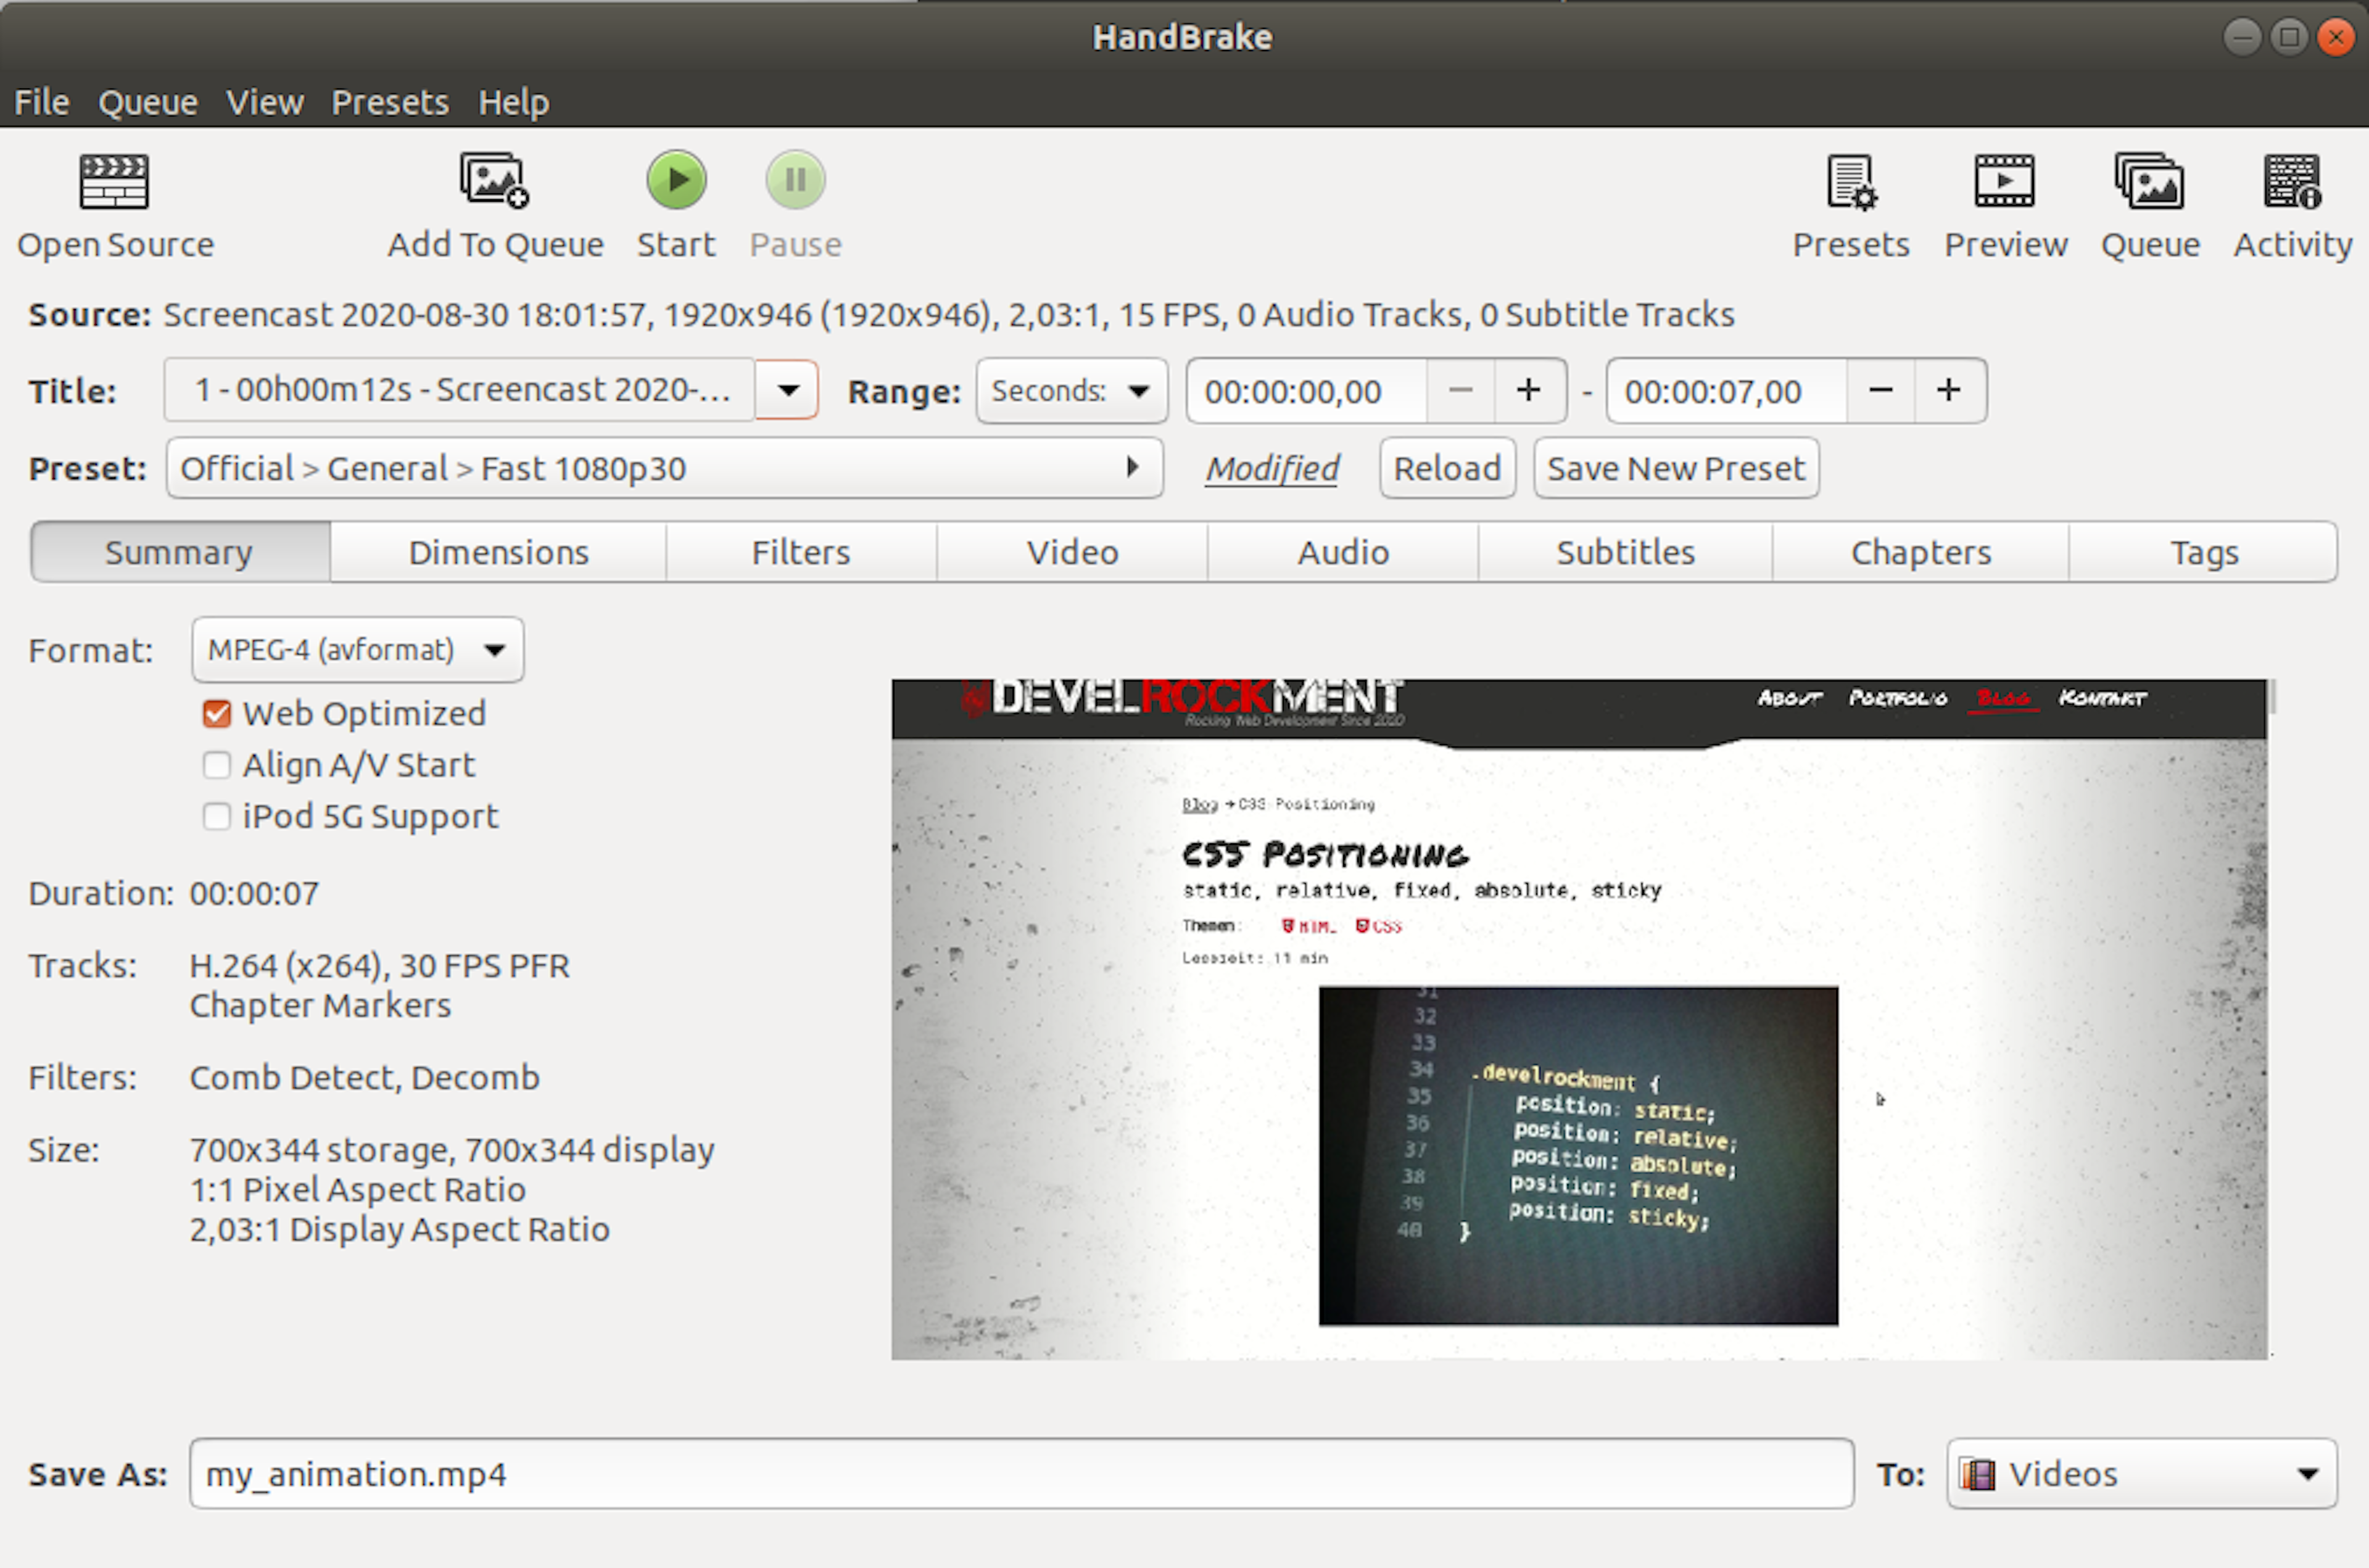
Open Source: Select the source Video-File
Range: Seconds: This option can be used to trim the Video-File from the start or the end
Format: MPEG-4 (This stands for MP4)
Web Optimized: Set active
Save As: Define your desired filename
Handbrake - Dimensions
In the Dimensions-Tab we can reduce the Video-File to the desired size.
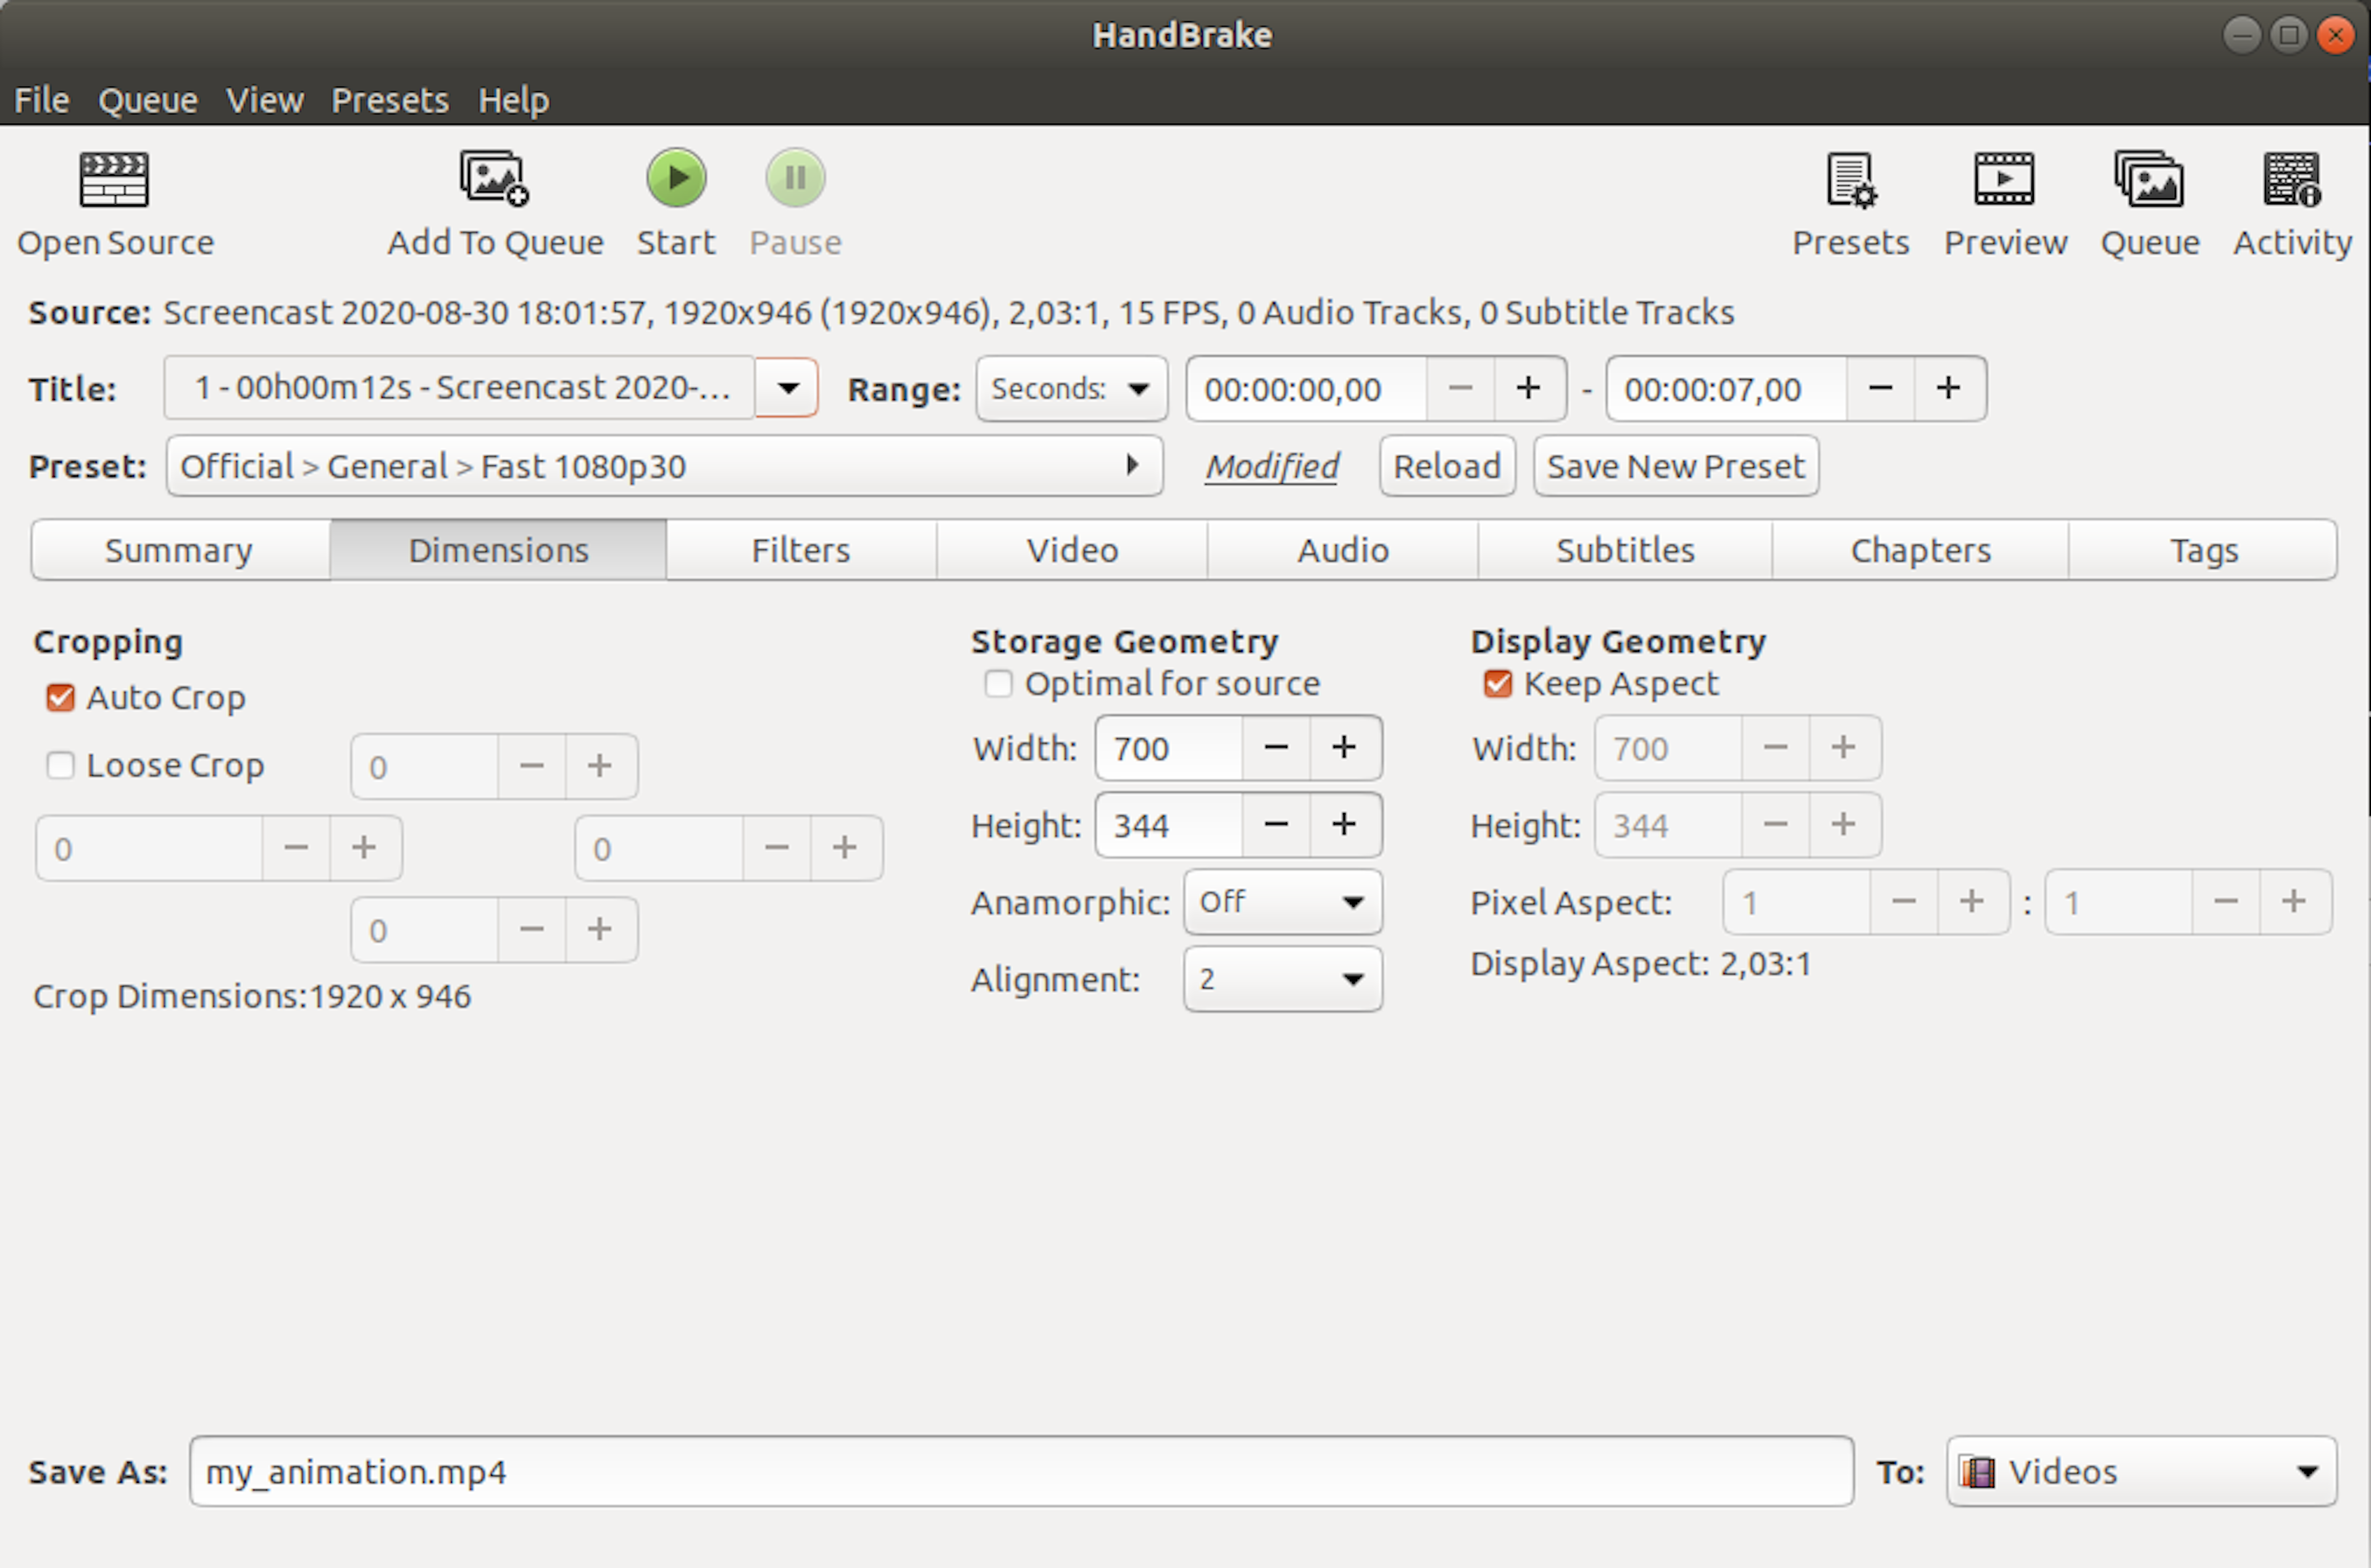
Anamorphic: Off
Storage Geometry: The desired Video-Size. As I mentioned before I usually use 700px as horizontal resolution.
Handbrake - Video
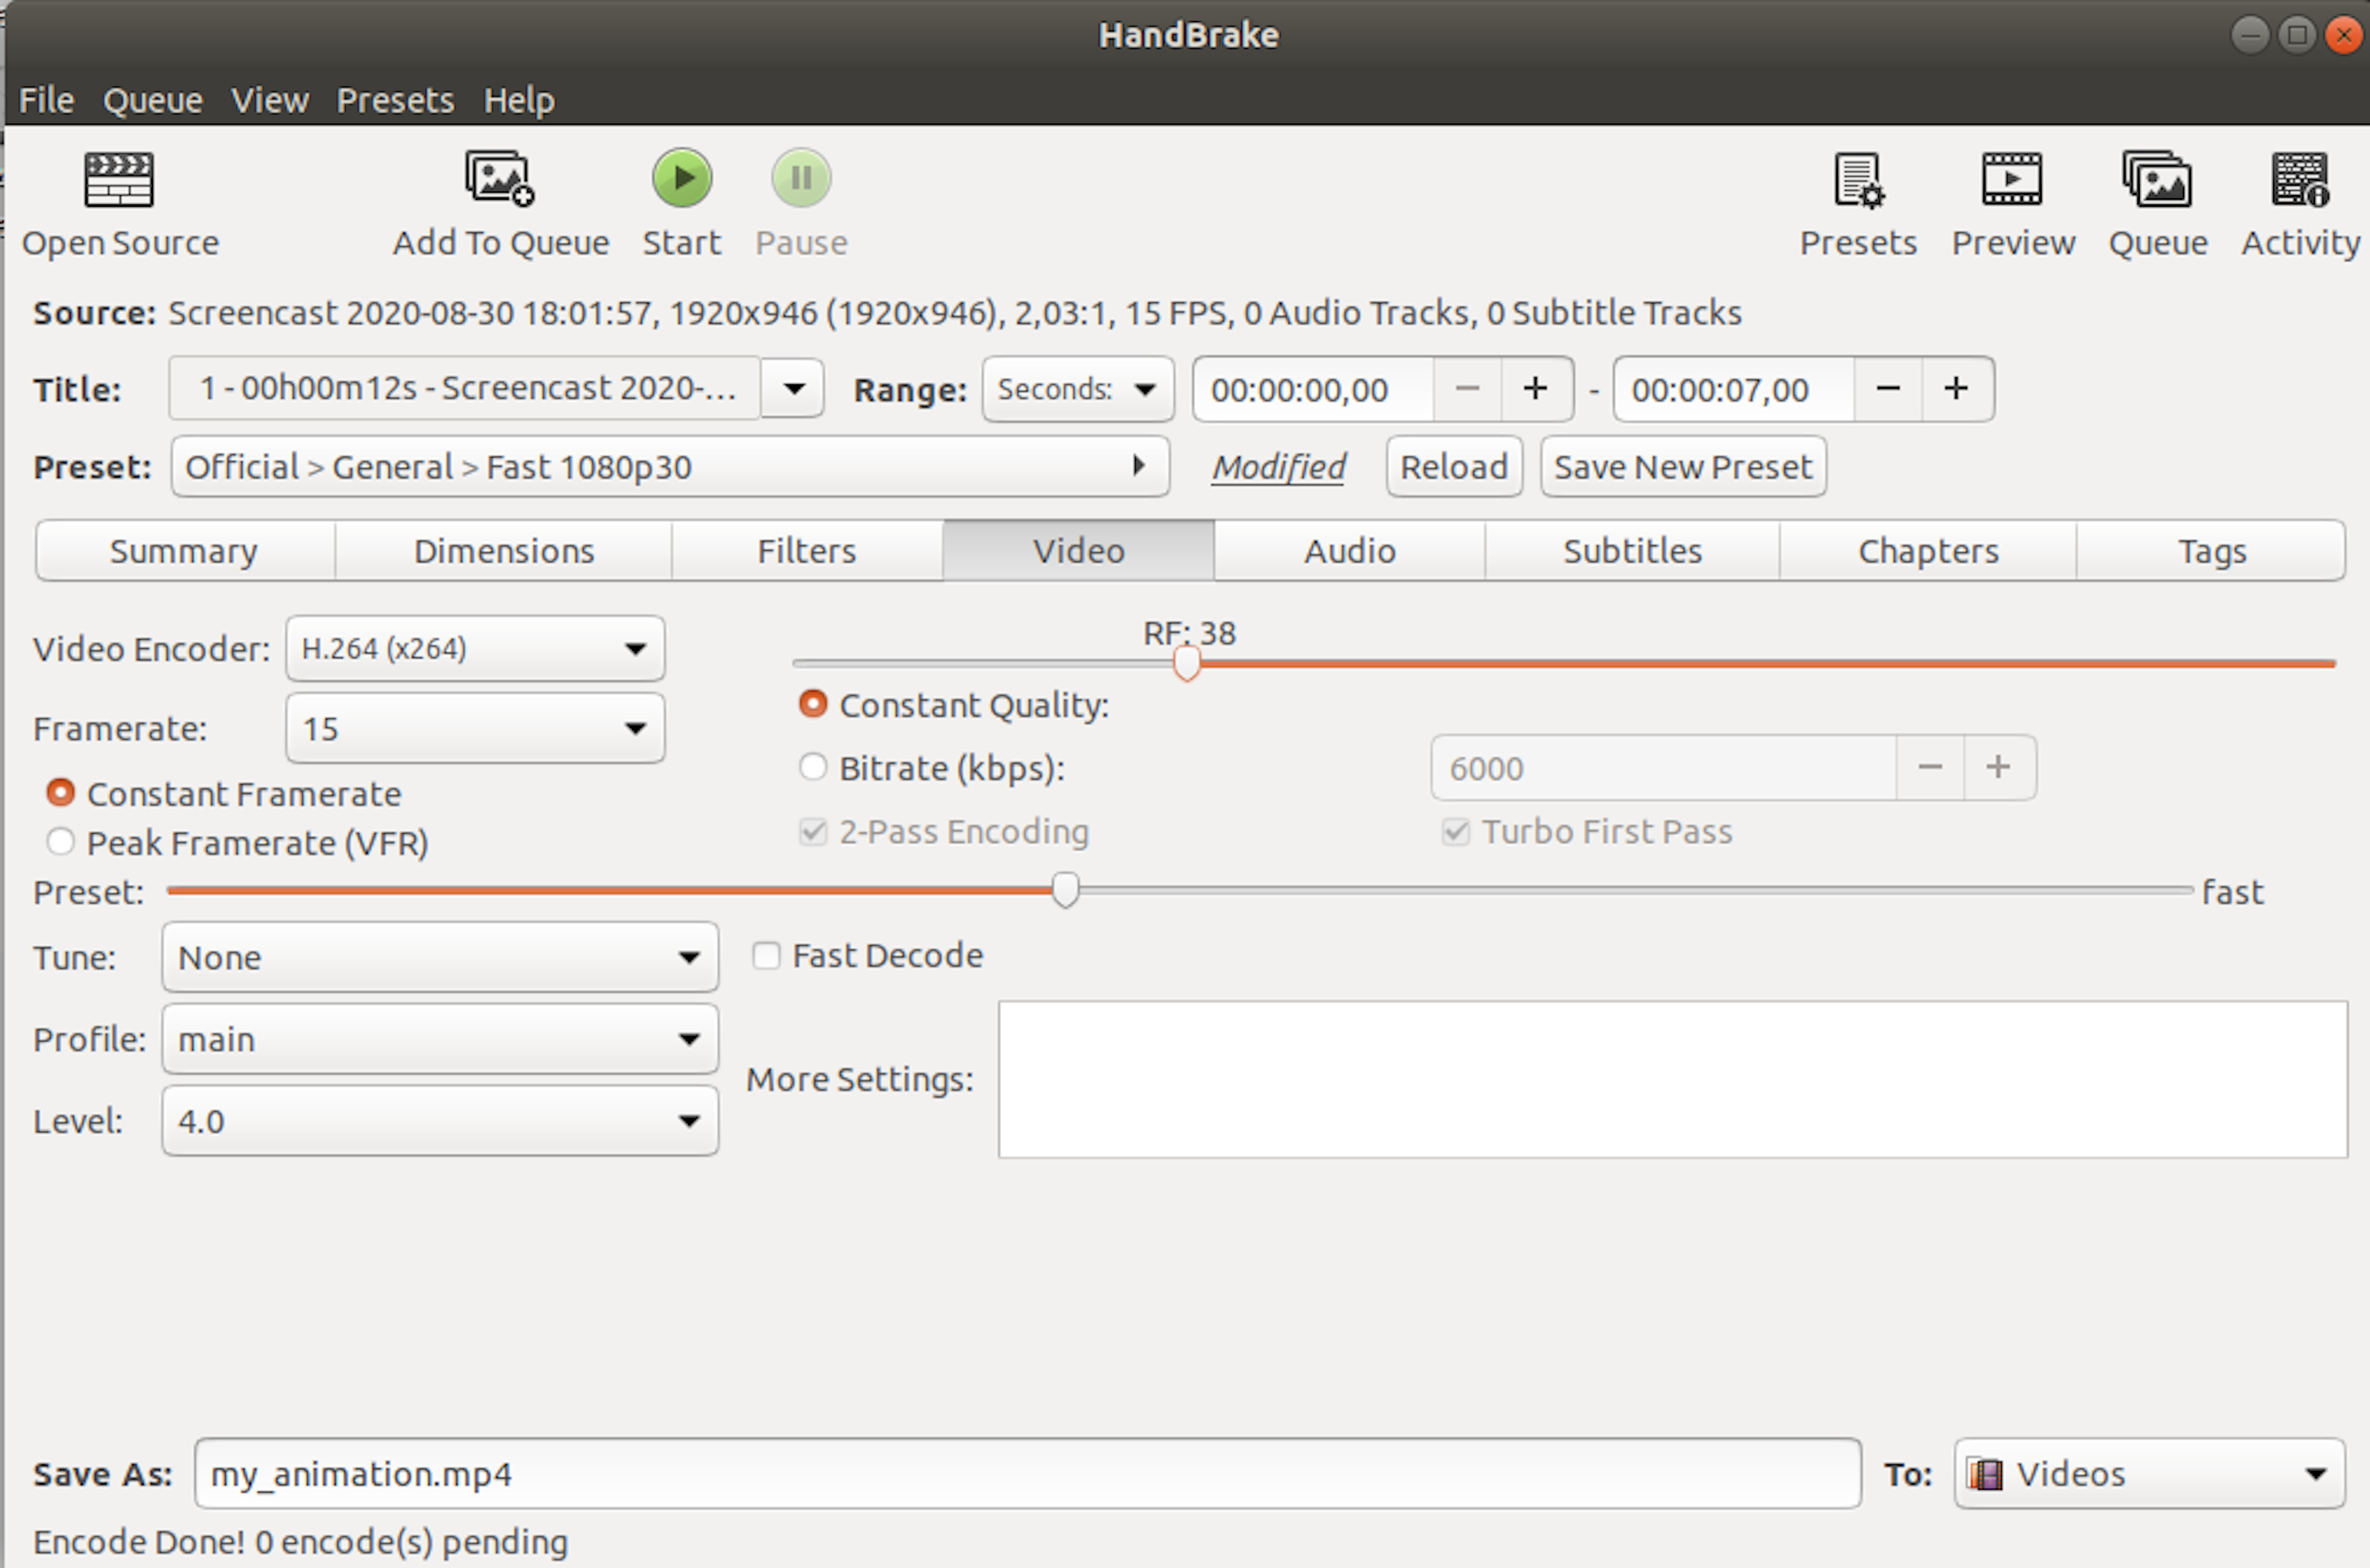
Video Encoder: H.264
This is the Video-Codec which is used inside the MP4 Container-Format.
Framerate: 15
The higher the framerate, the smoother the animation, but the larger the size of the file.
For my purposes 15 frames per second are usually sufficient.
Constant Framerate
Guaranteed a constant frame rate
Constant Quality: RF: 38
The higher the quality, the larger the size of the file.
How the quality set here affects the perceived quality of the video depends heavily on the content of the video.
If a video has e.g. a lot of movement and/or a lot of small details, the perceived quality will suffer more quickly if the quality setting is low.
So everyone has to find the exact right setting for their particular use-case for themselves.
Handbrake - Audio
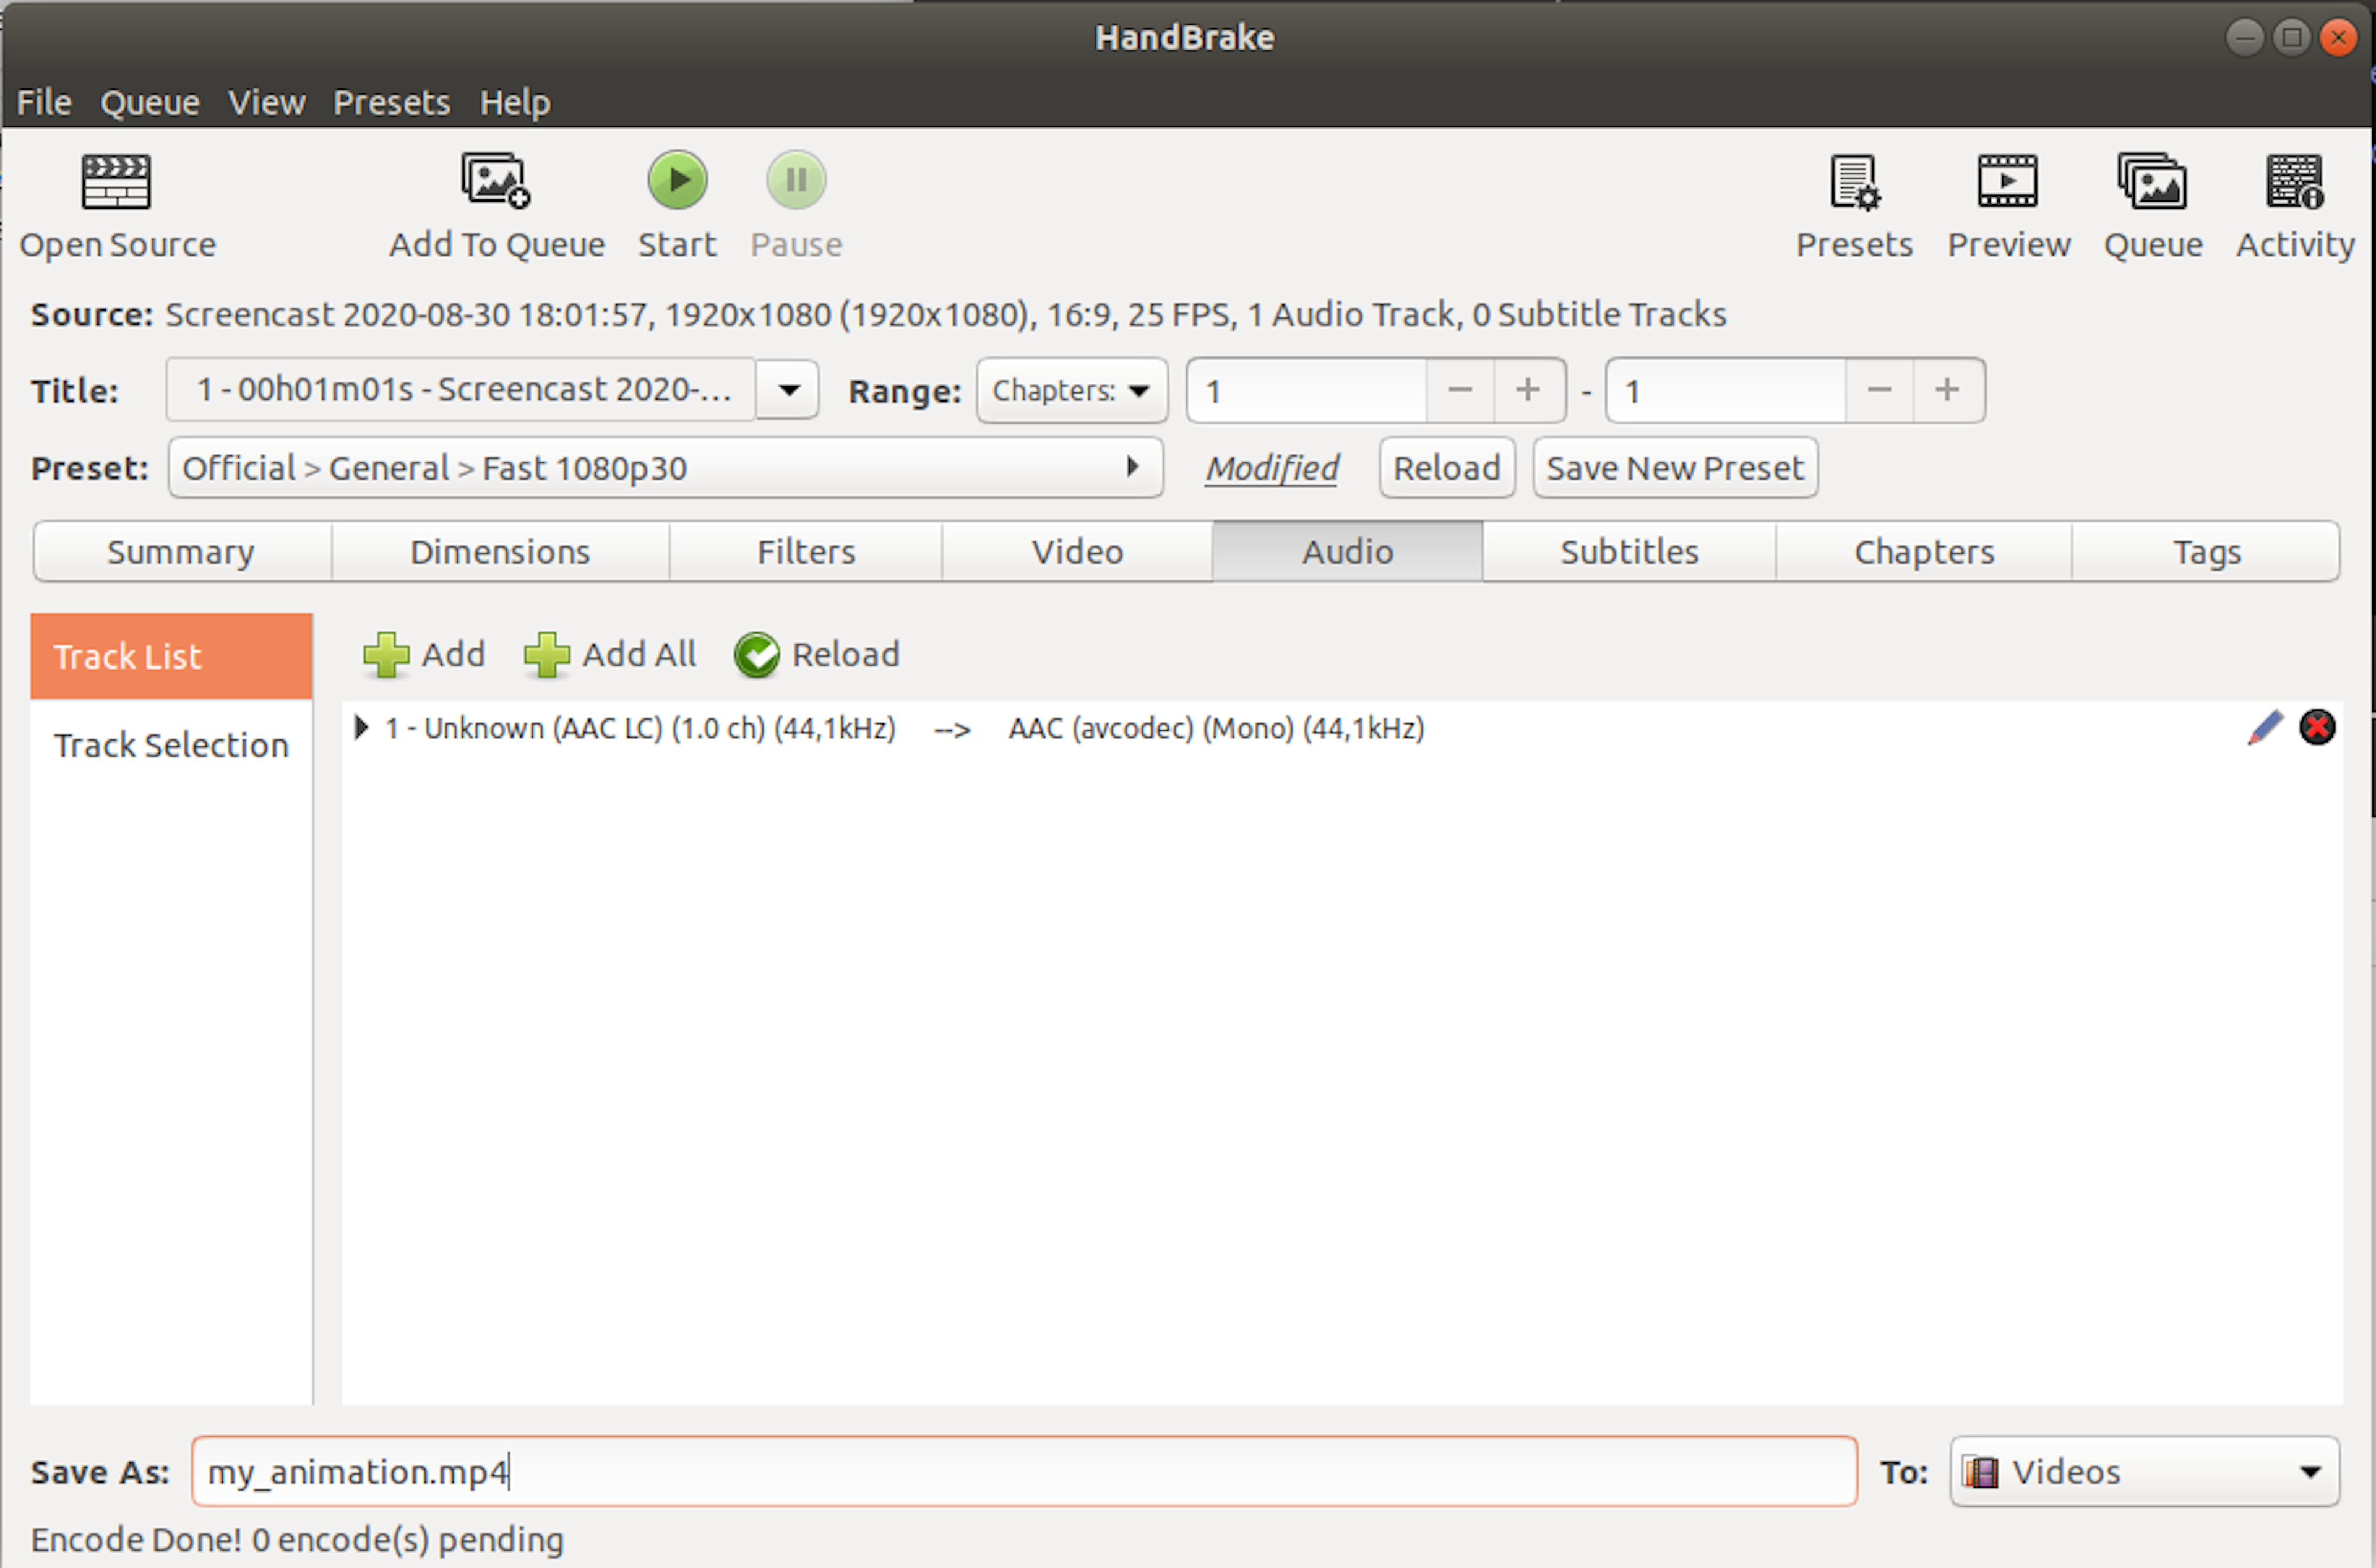
If the source Video-File has been recorded with an audio track we can delete it here, we will not need it for our use-case. Also this reduces the file-size further.
My example Video has a size of 65,8kB with a length of 7 Seconds with this settings.
Sanity
At the time of writing this there is no Schema-Type for Video-Files in Sanity, so we are going to create our own Custom-Type “gifLikeVideo” based on the Schema-Type “file”:
JAVASCRIPT
export default {
  name: "gifLikeVideo",
  type: "file",
  options: {
    storeOriginalFilename: false,
    accept: ".mp4"
  }
};
storeOriginalFilename: false
With this setting Sanity overwrites the filename at upload in order to prevent the user from accidentally leaking unwanted information that way.accept: ".mp4"
In order to avoid errors only .mp4-Files are allowed for upload.
This Custom-Type can now be used everywhere inside Sanity.
(Dont forget to assign it in createSchema() to the according Schema)
For example inside a Schema-Type “block”, in order to use the animations inside of a Text-Block.
JAVASCRIPT
    ...
    {
      name: "body",
      type: "array",
      title: "Body",
      of: [
        {
          title: "Block",
          type: "block",
          styles: [
            { title: "Normal", value: "normal" },
            { title: "H1", value: "h2" },
            { title: "H2", value: "h3" }
          ],
          marks: {
            decorators: [
              { title: "Strong", value: "strong" },
              { title: "Emphasis", value: "em" },
            ],
          }
        },
        {
          title: "GIFlikeVideo",
          type: "gifLikeVideo"
        },
      ]
    }
    ...
Gatsby
In order to display the schema type “block” with the containing animations we are going to use block-content-to-react.
JSX
import React from "react";
import { graphql } from "gatsby";
import PortableText from "@sanity/block-content-to-react";
import clientConfig from "../../client-config";

const BlogTemplate = (props) => {
  const blog = props.data.sanityBlog;

  const gifLikeVideo = (props) => {
    const targetFile = allSanityFileAsset.nodes.find((node) => {
      return node._id === props.node.asset._ref;
    });

    return (
      <div>
        <video autoPlay controls={false} loop muted preload={"auto"}>
          <source src={targetFile.url} type="video/mp4" />
        </video>
      </div>
    );
  };

  return (
    <div>
      <PortableText
        blocks={blog._rawBody}
        serializers={{
          types: { gifLikeVideo },
        }}
        {...clientConfig.sanity}
      />
    </div>
  );
};

export const query = graphql`
  query($id: String!) {
    sanityBlog(_id: { eq: $id }) {
      _rawBody
    }

    allSanityFileAsset {
      nodes {
        _id
        url
      }
    }
  }
`;

export default BlogTemplate;
Using GraphQL we read out the _rawBody, which contains the data of the previously defined schema type "block". Inside of “block” we can find, among others, our previously defined Custom-Type “gifLikeVideo” with the MP4-Animations.
However, the URL to our video file is not stored here, so we also have to load allSanityFileAsset.
Within <PortableText /> we define a serializer for our custom type "gifLikeVideo".
Then we create a function (the serializer) with the same name:
JSX
...
  const gifLikeVideo = (props) => {
    const targetFile = allSanityFileAsset.nodes.find((node) => {
      return node._id === props.node.asset._ref;
    });

    return (
      <div>
        <video autoPlay controls={false} loop muted preload={"auto"}>
          <source src={targetFile.url} type="video/mp4" />
        </video>
      </div>
    );
  };
...
Using find() we search all File-Assets from Sanity for that one where the _id property matches the _ref property of the asset from the Schema-Type “block”.
That way we can get the URL for our Video-File.
Finally, we need to define the following attributes in the <video>-Tag:autoPlay - The video starts playing automatically when it is finished loading.controls={false} – Control-Elements (like a play- or pause-button) are not displayedloop – Plays the video in a repeating loopmuted – Mutes the sound output of our Video-File. This attribute must also be set when there is no audio-track in the file because otherwise Google-Chrome will prevent the auto-playpreload={“auto”} – Controls the loading behavior. The Video-File should be loaded together with the website. You can find more information about that here.
With these settings, the video behaves as you are used to from GIF animations.
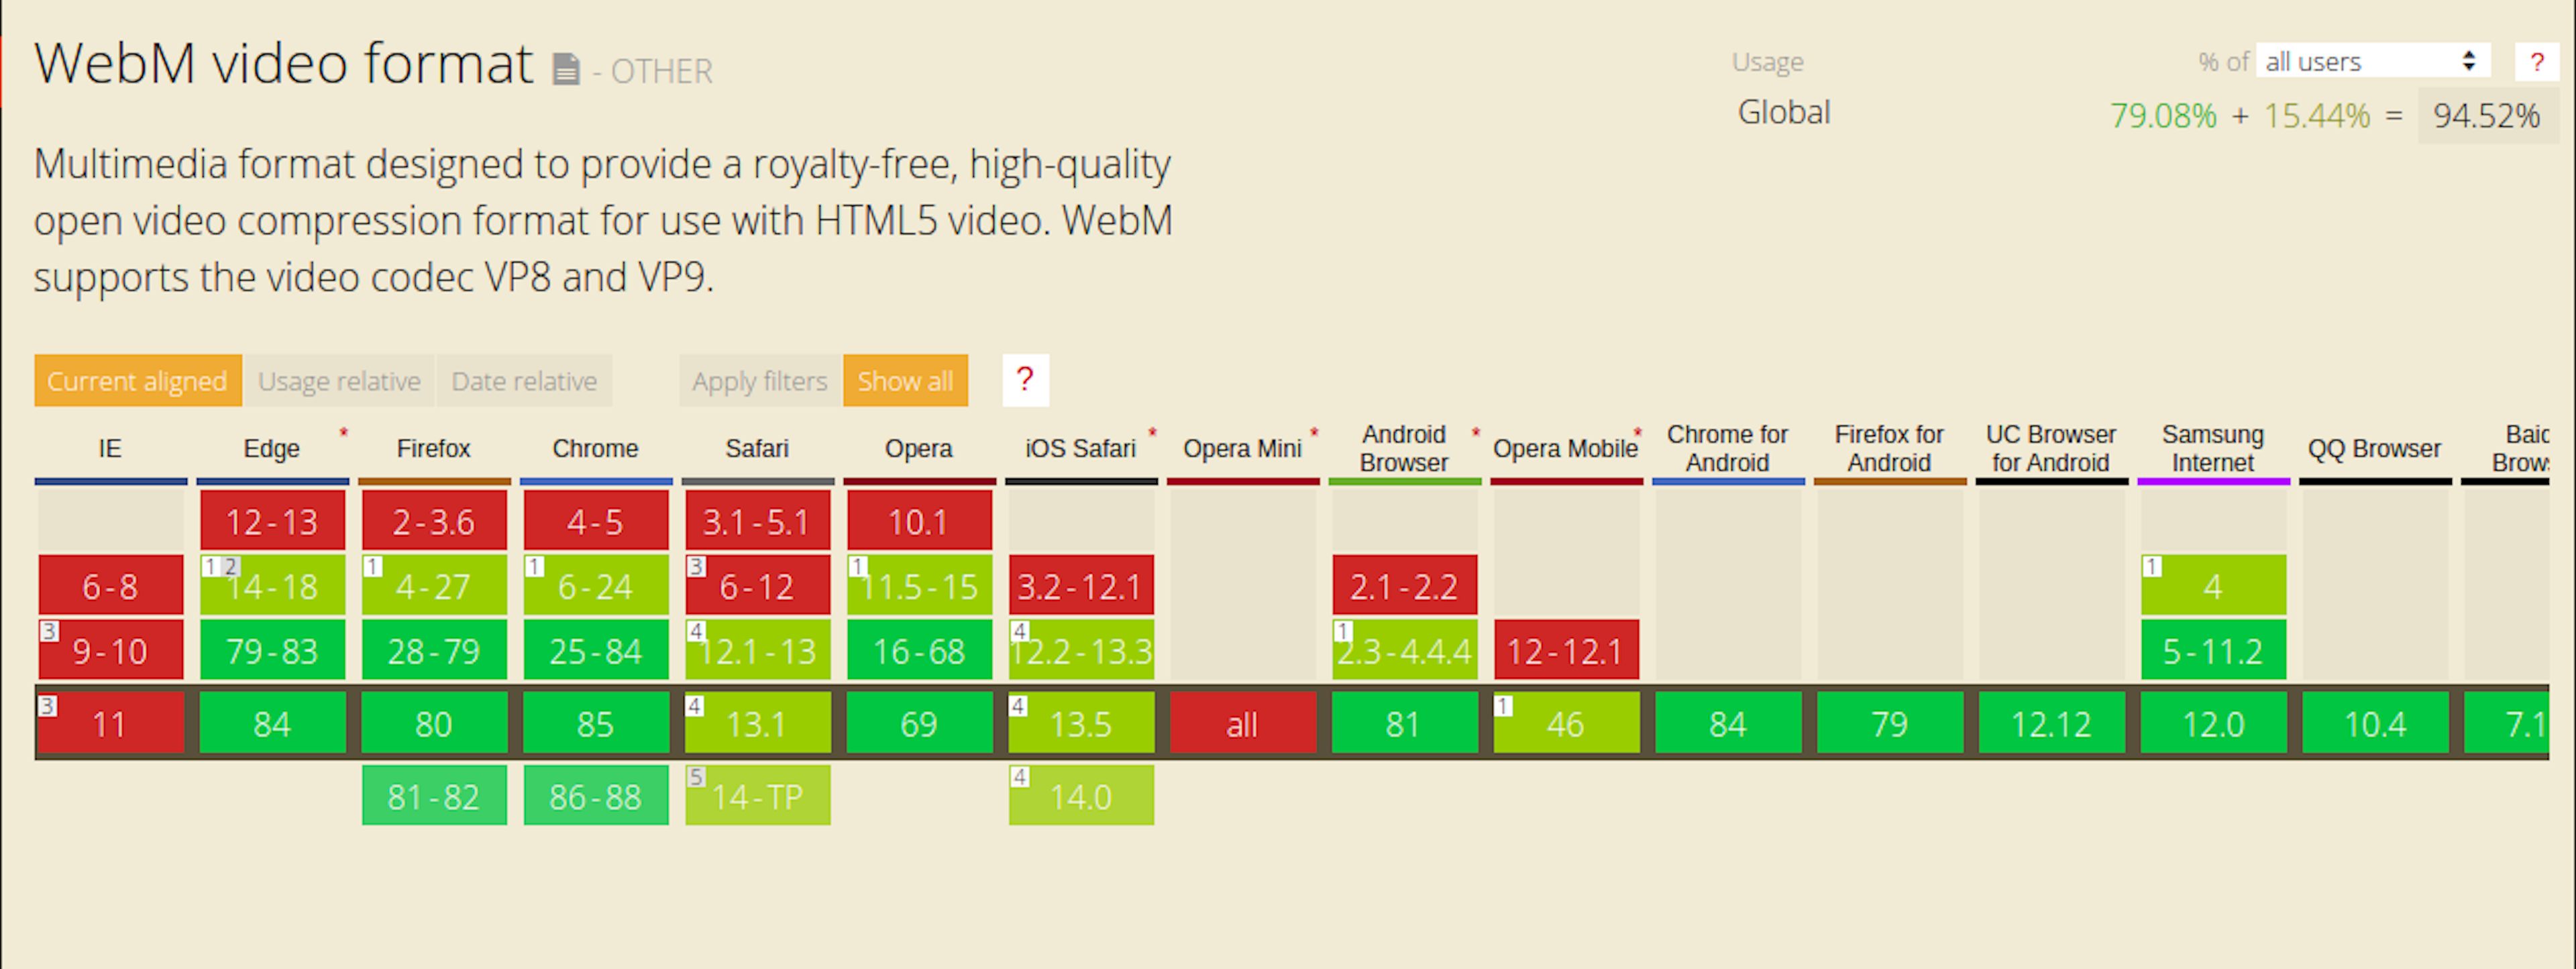
WebM
WebM is a newer Video-Format than MP4 which offers even smaller file-sizes for the same video-quality.
The format is currently not yet supported by that many browsers, at time of writing this by 94.52%.
<video> offers the possibility to define more than one <source>. The user's browser then loads the file that it supports:
JSX
  ...
  <div>
    <video autoPlay controls={false} loop muted preload={"auto"}>
      <source src={targetFileWebM.url} type="video/webm" />
      <source src={targetFile.url} type="video/mp4" />
    </video>
  </div>
  ...
To convert a video to WebM with Handbrake, select the format: Matroska in the Summary-Tab:
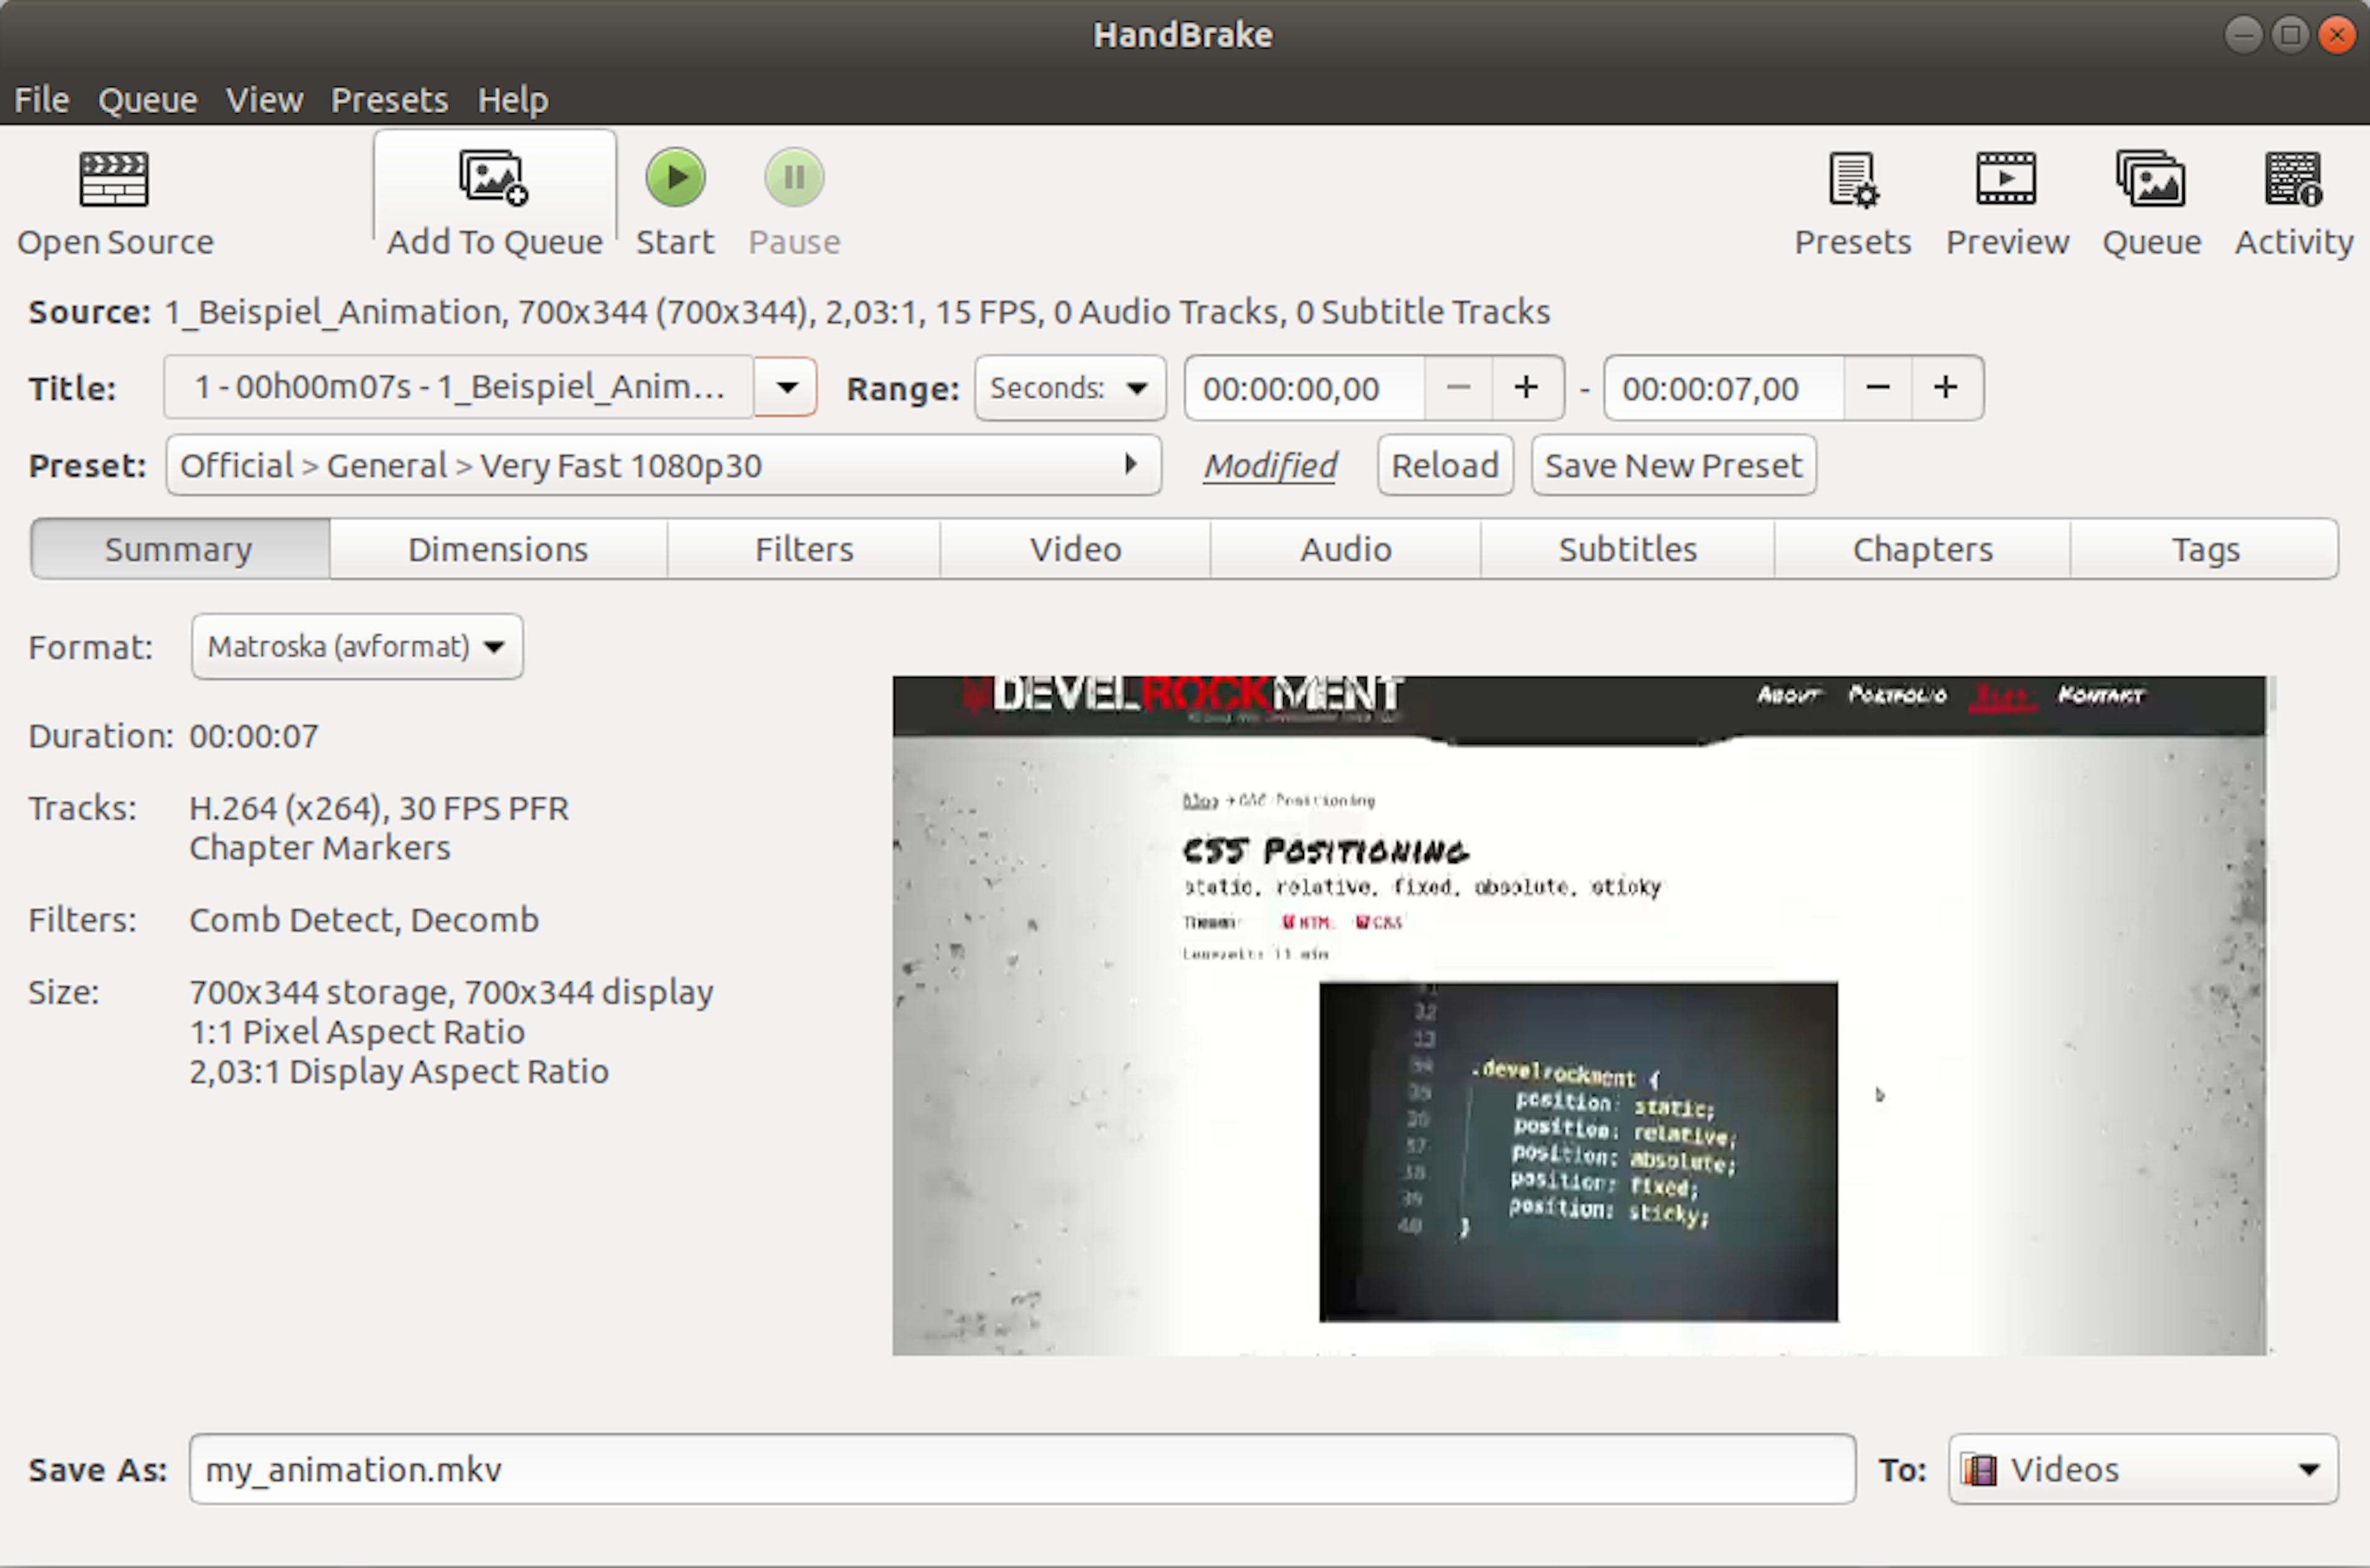
The file-ending of the output file changes to .mkv
(WebM is a subset of MKV)
We can simply overwrite the file-ending and call our output file my_animation.webm
The corresponding Video-Codec has to be set in the video tab:
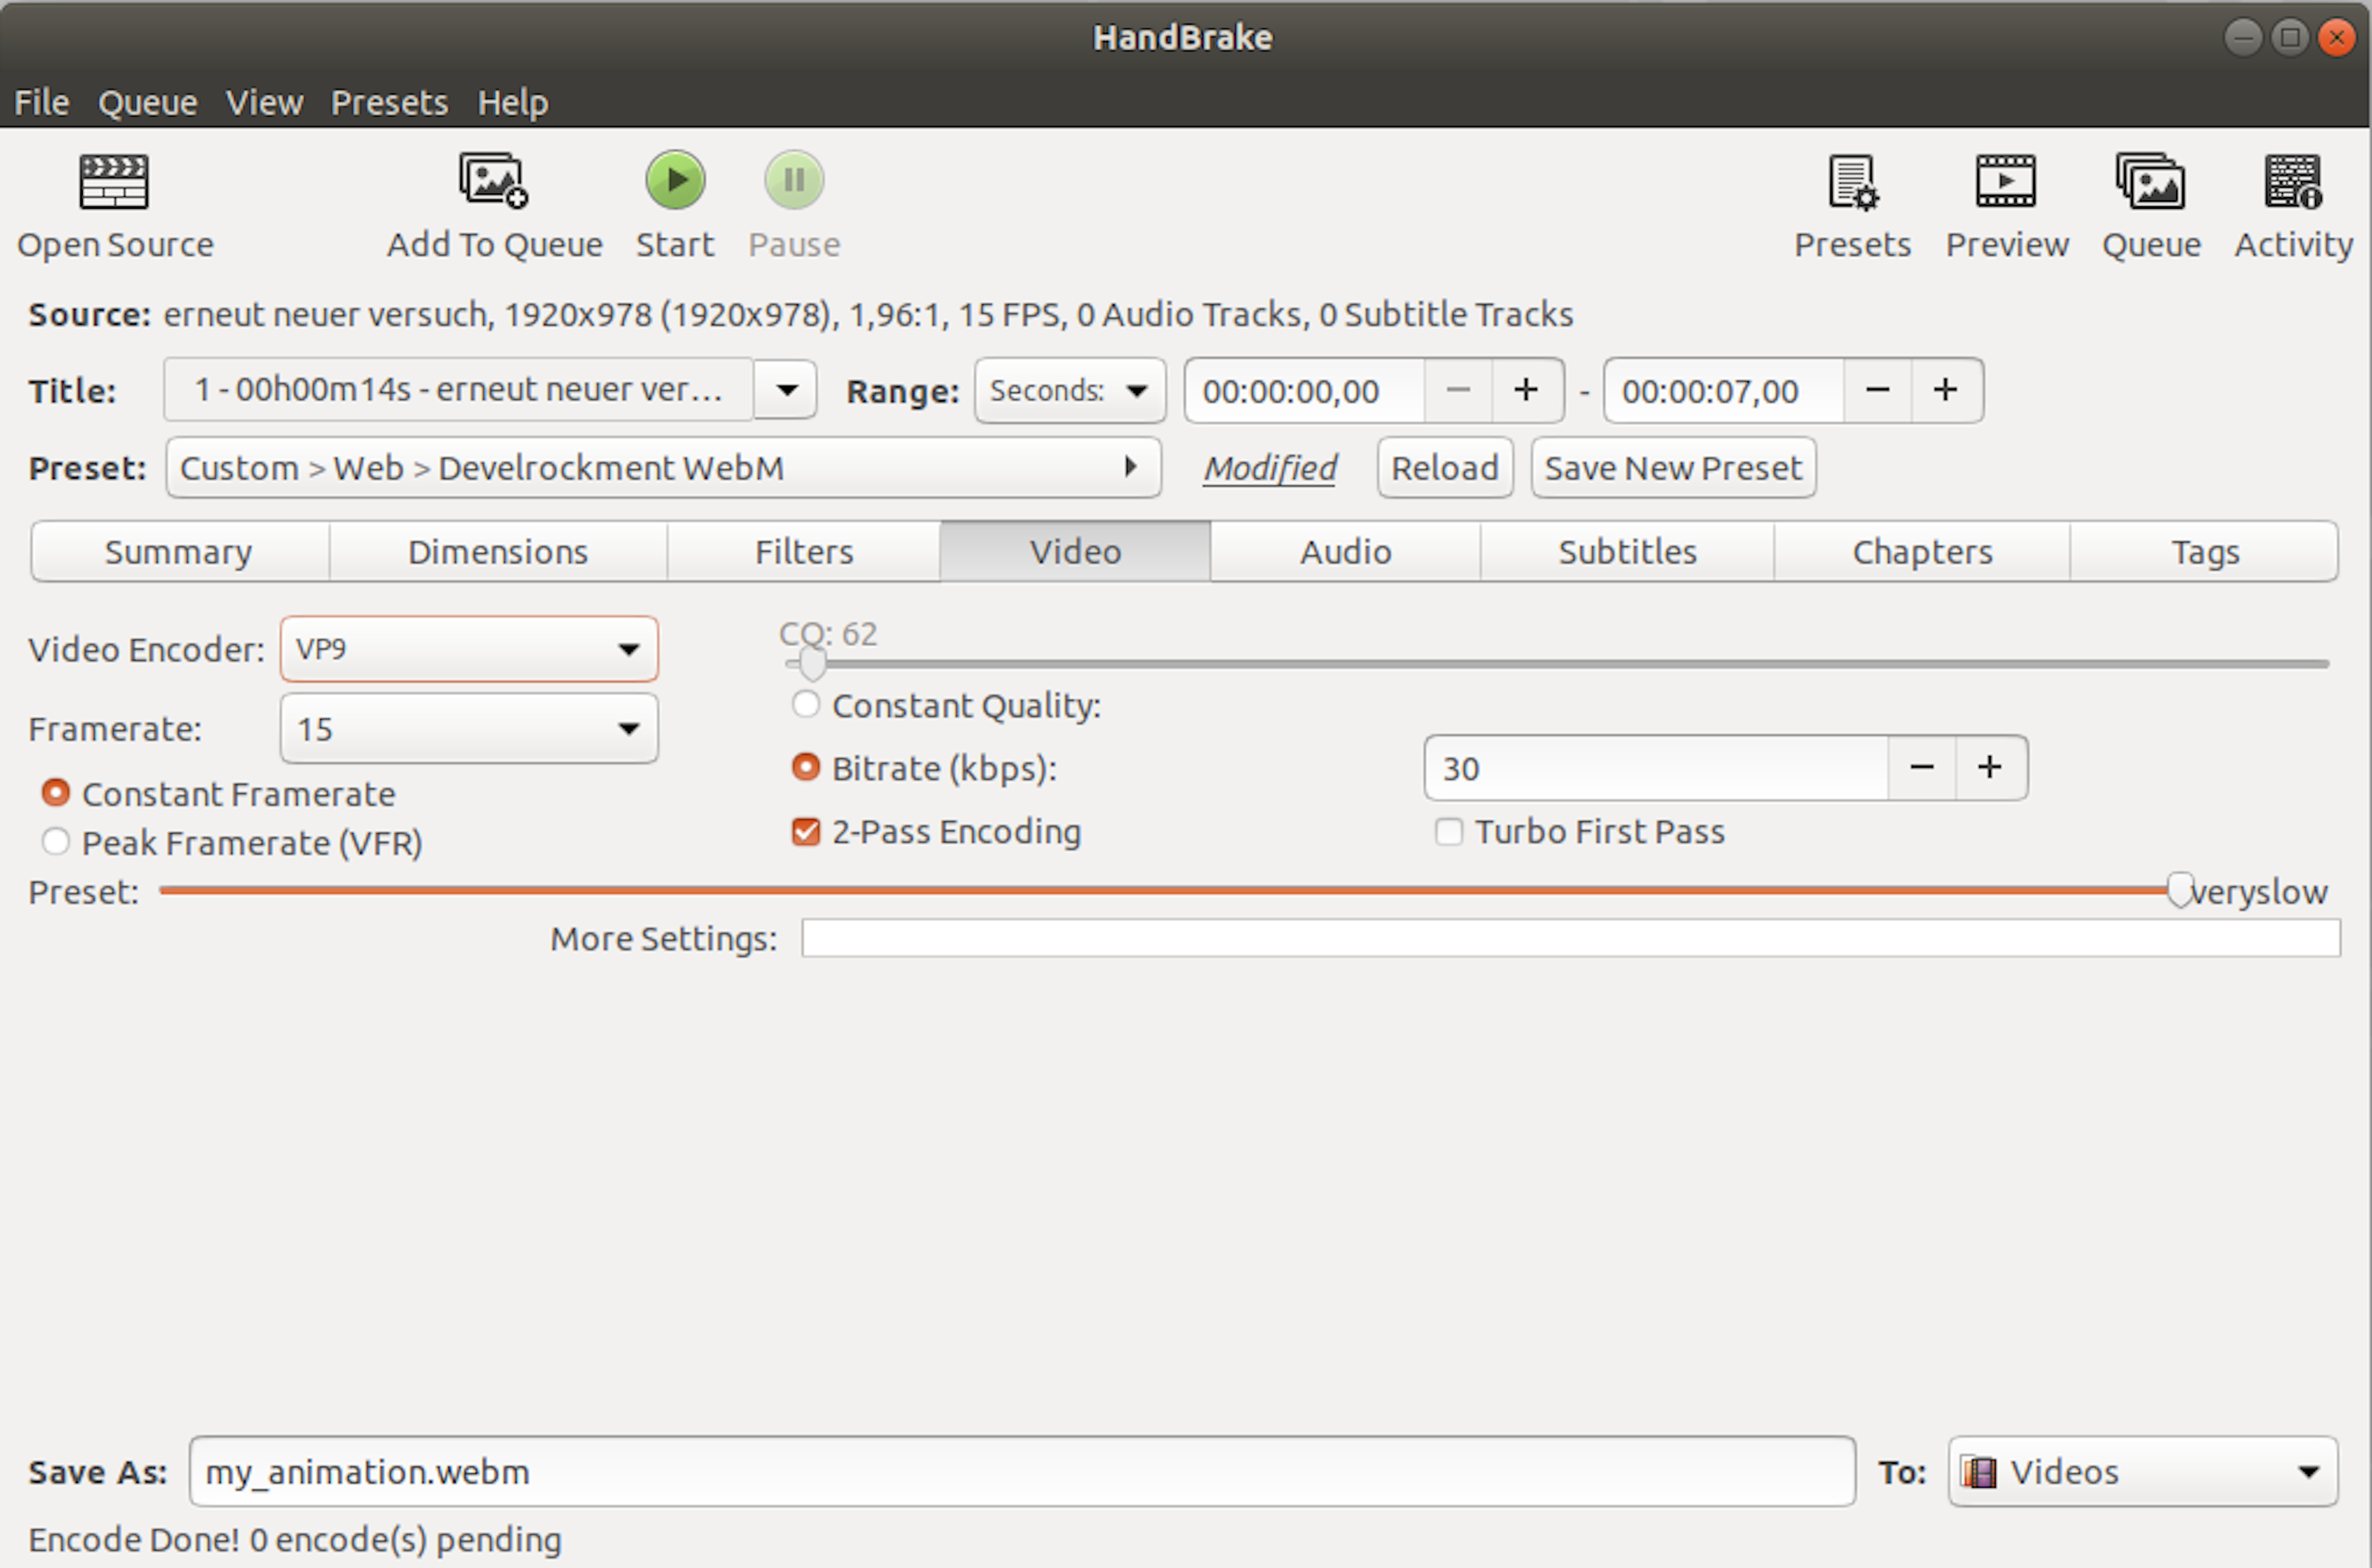
For the WebM Container-Format we select VP9.
With the following settings I achieve a video quality similar to that of the MP4 video for my example file:
Bitrate (kbps): 30
2-Pass Encoding
Preset: veryslow
With a file size of only 26,7kB instead of 65,8kB.
Feedback Me: